About this deal
Follow these step-by-step instructions on how to press flowers in the microwave for great results! You’ll need a microwave flower press, scissors, tweezers, lining paper, and something to store your flowers in. I like to use glassine bags or sealed reusable bags like this. You can also start with a microwave press kit, as I did. To create perfectly dried and flattened flowers, you’ll need more than just a good flower press. You’ll also need the proper absorbent paper, not to mention scissors and a few other useful supplies.
Much like the book-press method, a homemade or store-bought wooden flower press can give you fabulous results. (Plus, you can decorate a wooden press or customize it to match your style-BONUS!) Supplies: Create jewellery using moulds, epoxy resin and a chain. They’re super easy to make using pre-made moulds and it means nobody else will have the same piece as you! There are flower press kits for adults and kids alike, starting at ages 5+. Kits for kids are made of extra-durable materials, and many include jumbo-sized screws that small hands can easily twist off. These often come with glue or tape as well, just to make the process a bit easier.
How To Make A Flower Memory Frame
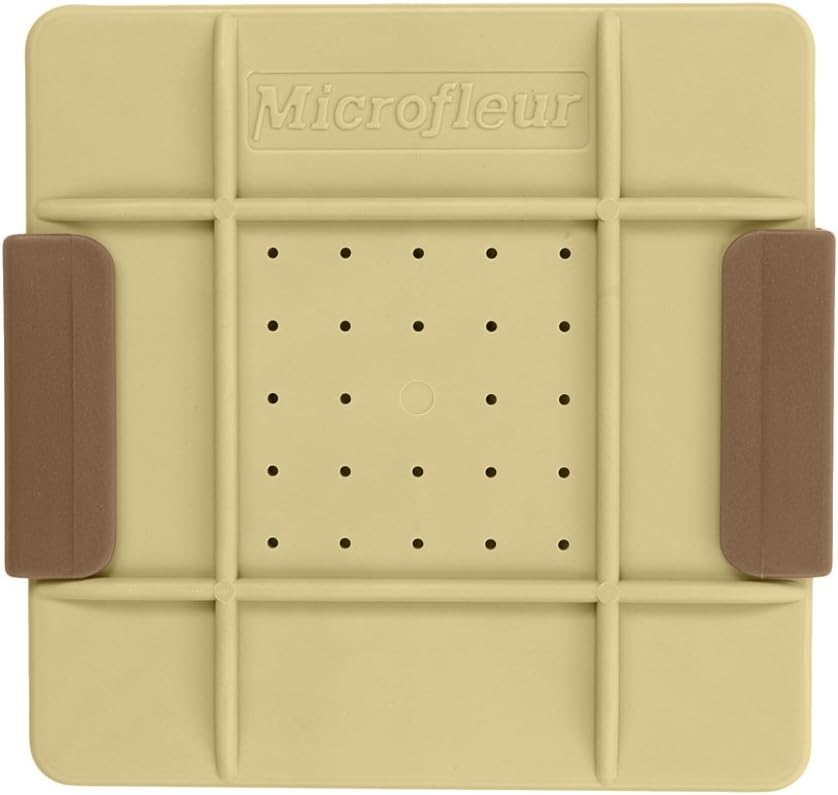
Another speedier method, pressing flowers in the microwave is possible using a specific microwave flower press kit or by making your own. To make an at-home kit safe for the microwave, place your flower between 2 pieces of paper, followed by cardboard and finally two ceramic tiles. Hold it all together using rubber bands. Microwave low for 30 to 60 seconds and let the press cool completely in between each round. Naturally flatter flowers, like daisies, aster and chamomile are easiest to press. I also found filler flowers like statice looked beautiful when pressed while left on the stem. But, who knows, you might not consider this an obstacle! It all comes down to experimenting with different options and finding what meets your projects’ needs. You don’t need perfectly pressed flowers to incorporate them into other artwork, soaps, candles, etc. Price Start by creating your layers. Open your microwave and lay each outer drying plate of the microwave press down like an open book. Place a wool pad on top of each and then lining paper. Before you begin, it's vital you choose the right flowers to press, as not every style will work. Opt for blooms that are naturally flat, such as pansies, daisies and violets. When flower pressing, choose foliage and plants that will look good when pressed flat – large flouncy blooms, for example, won't work as well.
Place your flowers onto the paper and add another layer of paper over your layout — just think flower/paper sandwich! Flower pressing is a pretty easy hobby to get into - you don’t need to have green fingers to get started! There are a few things you should know before you get started though:Absorbent paper. The majority of flower presses will use some kind of absorbent paper. While paper towels can also work, they may leave imprints and spoil the flawlessly flattened look. Most kits will include good, old-fashioned parchment paper! Choose your flowers from the list above. Select the best ones and decide which colours you want. Adding greenery amongst the flowers will create a unique look, so select some complementary foliage and leaves too. Gently clean your chosen flowers, dusting away any insects or debris. Remove as much moisture or wetness as possible. If using a bouquet, keep it in water until ready to press. (Tip: Always cut stems at an angle and place flowers in a vase with flower food to maintain freshness. Replace water daily and remove any leaves below the water line.) The list of twenty-five flowers, leaves, and herbs that I shared here is ideal for pressing. But I’ve found that fresh flowers and plants of low moisture work best for a microwave press. And it is generally a good idea to avoid white flowers because they tend to brown more easily when heated. Bright-colored flowers, on the other hand, retain their hues much better. How do you press flowers in the microwave? Price can be based on a number of factors: the quality of materials (especially for wooden presses), whether or not your kit is customizable, quality of blotting paper if included, if technology is involved, if devices are handmade, artisan creations, etc.
They’re straightforward, appropriate for almost every age group, and are relatively affordable, considering they’re built to last. You may need to complete the drying process in a book or press but this should only take a couple of days. How to display pressed flowers: Ideas and inspiration Since I am all about preserving memories, I wanted to share a project that would be great for Mother’s Day or any other occasion, and help you preserve your flowers to enjoy them even longer. So, I made these pressed flower keepsake frames! A great gift to give, in and of itself, or a great way to preserve a gift you receive.Drill a hole in each corner of the boards, about 1 inch from the edge. Make sure you match the size of your bolts and line up the holes on both boards. Step 2: Arrange flowers in between cardboard and paper Blank notecards and envelopes. Some kits have you set with blank notecards and envelopes to decorate with your own pressed flowers. This a fantastic way to use them as decor. If you’re interested in this, it may be something to look for! Lastly, wood is simply beautiful. It will give your press a lovely, rustic look! Why Are Flower Press Kits So Great? Moreover, I enjoy creating DIY dried flower projects such as dried flower wax melts, suspending dried flower petals in soap, and homemade lavender sachets.
It’s a convenient option if you’re on a budget and love pressing flowers for small-scale projects like making bookmarks, jewelry, or resin items. And of course, it’s a really original and affordable gift for nature-lovers, travelers and journalers! By using a microwave flower press, you skip the weeks it would typically take to press flowers in a book or wood press and instead have your flowers ready to use in just a few minutes. The kit includes a 10 x 10cm (~4 x 4 in) press, corrugated cardboard, blotting paper, plastic screws/wing nuts, trinket boxes, greeting cards, envelopes, bookmarks, and every supply you’ll need to assemble all of the projects it contains.All in all, it’s fun to experiment and see how each flower changes as it dries, both in size, shape and hue! Place the blooms on top of a piece of paper towel or on one side of a cotton rag. However you place your blooms will be exactly how they dry, so make sure petals are flat and smoothed out. Jewelry. Combine pressed flowers with resin, and you can make an amazing amount of jewelry. This includes earrings and rings in particular, as they are big enough to really showcase a flower. A great gift idea would be to gift a beautiful frame alongside a flower bouquet, like the gorgeous FruitFlowers below to give the recipient an easy boost towards preserving their flowers for years to come!
 Great Deal